Let’s say you have a VM in Azure North Central. You created this VM from a custom image that you maintain in an Azure image repository. Now, what if you wanted to create that same VM in Azure South Central, and use the same reference image? A standard image repository is limited to the region that it exists in. The answer here is to create a Shared Image Library, add the image to it, and then configure the image to replicate to other Azure regions.
This article assumes you already have an image.
First, create a Shared Image Gallery in Azure. Browse to the Azure portal (https://portal.azure.com), and (from the home page) click “create a resource”.

Search for “Shared Image Gallery” and then click “Create”.
Configure a subscription, resource group, and then name the Shared Image Gallery and configure what region you want it to live in. You will want to create it in the same region as your standard image repository.

If you want to assign some tags to this new resource, continue to the next page. Otherwise, click “Review + Create”.

On the final page, if the validation is successful, click “Create”.

It should take less than a minute to create the shared image gallery. Once its created, click “Go to resource”.

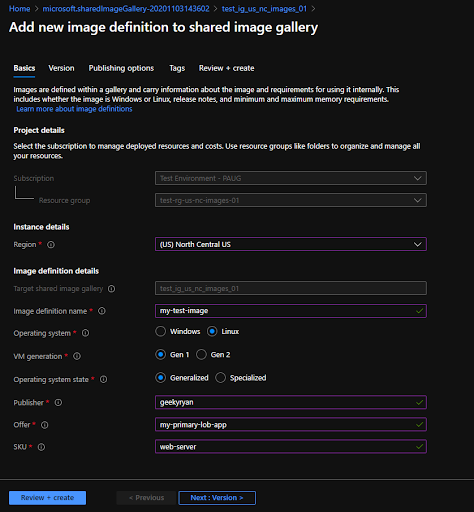
In the shared image gallery blade, click “Add new image definition”.

On the next page, select the region where your existing image repository lives, give the image definition a name, and then fill out the rest of the information as needed. The publisher will typically be the name of your company/organization. The offer will typically be set to the name of the overall application, being that servers typically host one piece of an application (example: database servers vs. application servers). The SKU will typically be set to the name of the component within the application (for example, a web server or database server).
Next, configure an image version. This should use the typical semantic format used in software development (major version, minor version, patch level). I will typically substitute the patch level with the date the image was captured. Probably not a best practice, but something that has served me well in the past.
Next, select the source image. This will be the image that you are copying from your standard image repository. You can also configure an end of life date for the image version here if you wish. In the “Target Regions” section at the bottom, select the region where you plan to create the new VM. Also select the target storage account type.

You can configure some publishing options and tags on the following pages. Though, it is not required. Click “Review + create”. After the validation passes, click “Create”.

This process will take a few minutes to complete. Once its finished, click on “go to resource”. You now have an image that is available to be deployed in the north central region or the south central region.